| In cases of damage where there were jagged protrusions,
Sailors had to install either patches from the exterior side or
box patches on the interior. There were three methods used for
these repairs: the pillow patch, mattress patch and box patch.
Pillow and mattress patches were installed from the exterior.
While interior patches required less to no rigging, they were
quicker, less complicated, safer and usually secured with
wooden, steel angle or pipe shoring. For some holes protruding
outward, Sailors installed a prefabricated patch on the inside,
securing it with T, J, L or folding “T” bolts, a line with turn
buckles, or shoring. Using these methods and procedures, they
patched areas where rates of flooding were the highest first.
During damage repairs, reports were made to the on scene
leader when the hole was under repair, the flooding rate, when
the repairs were completed, when the compartment was being
dewatered, upon completion of dewatering and residual leakage,
if any.
- Pillow Patch
This method of temporary DC repair was quick, simple and
required few personnel. Prefabricated materials could be
used, or personnel could improvise a suitable patch.
For holes protruding inward, an excellent patch could be
quickly made with a pillow with a hole punched in the
center. The back-up board and plate also had to have a hole
in the center. A stout line was passed through the padding
and board and knotted on each side of the patch assembly
securely. The entire patch was then placed on the outside of
the hole and hauled into position. The weighted, bitter end
of the line was passed through the hull hole. A Sailor
retrieved the line and attached it around a stanchion. A
Spanish windless was fabricated to take in the slack and
create tension on the patch line until it was securely
pulled into place. Once secured, they tied it off and
secured the Spanish windless to prevent it from unwinding.
For holes protruding outward, the patch was installed on the
inside and secured with either a T, J L or folding “T” bolts
and a line with turn buckles; otherwise it could be shored
it in place.
A boatswain’s mate second class (BM2) was in charge, with
three personnel required to fabricate, rig and install the
patch. They were usually one boatswain’s mate and two damage
controlmen (DCs) or carpenter’s mates from repairs 1 and 3
and their unit lockers.
- Mattress Patch
Mattress patches were used on damage generally caused from
shell, bomb or torpedo fragments. This method of temporary
DC repair took more time, was more difficult to fabricate
and rig, was more risky and required more personnel.
To fabricate the mattress patch, Sailors started by drilling
two holes through a mess table top and mattress. They ran
two ¾- by 10-inch long threaded eye hook bolts through the
holes in the table top, then inserted large washers and
backing plates. Oakum was wrapped around the throat of the
bolt stock on each side, between the nuts and washers, to
reduce leakage. The bolts were then tightened to a snug fit.
They also drilled 5/8-inch holes in each end of the table or
backing plate to insert and tie off ½-inch guy lines. A
1-inch by 25-foot line was inserted through the eye hooks.
For weight to facilitate catching the line and hauling it in
through the damage hole, Sailors attached a large set of
steel washers or metal “O” rings on the bitter end of the
line.
As the mattress patch was lowered over the side, guy lines
were used fore and aft to control the movement and guide the
patch into place. A Sailor stood by in the designated
damaged compartment below decks to retrieve the line and
patch, pull the bitter end of the line through the damage
hole opening and attach it around a stanchion or other
stable structure. A Spanish windless was fabricated to take
in the slack and create tension on the patch line until it
was securely pulled into place. Once secured, they tied it
off and secured the Spanish windless to prevent it from
unwinding.
A boatswain’s mate first class (BM1) was in charge because
of the rigging and safety involved, with four to five
personnel required to fabricate, rig and install the patch.
The team usually came from repairs 1 and 3 and their unit
lockers and included one boatswain’s mate for rigging, two
damage controlmen (DCs) or carpenter’s mates to fabricate
and assist in rigging, and one shipfitter-metalsmith (SFM)
for welding if required and fabrication.
- Box Patch
This method of temporary DC repair was quick, simple and
required fewer personnel than pillow or mattress patch
methods. Prefabricated materials could be used, or personnel
could improvise a modified patch to match the damaged hull
configuration.
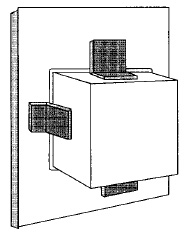
Patching for holes protruding inward, and especially for
holes with jagged edges sticking inboard, were miniature
cofferdams or open box patches. It could be made of either
wood or metal. The open wooden box was usually 18 inches
square and 6 inches deep. It could be made and shaped to fit
the contour of the hull, fitted with a rubber gasket, placed
over the hole, and shored in place. The steel boxes were
fabricated with the same dimensions, with a rubber gasket
glued around the 1-inch face of the box patch and welded
with angle iron. “L”-shaped clips, 4 by 1 ½ by 1 ½ inches,
were welded on top for shoring anchor points. Some box patch
sizes were prefabricated and stored near the repair lockers
in each section of the ship.
A damage controlman (DC) or carpenter’s mate was in charge
and assisted, with one shipfitter-metalsmith (SFM) for
welding, fabrication and installing the patch. These
personnel were usually from repairs 2, 3 or 5.
|